🔹 What is Doxygen?
Doxygen is a documentation generator tool that:
- Parses your code (C++, Python, Java, JavaScript, and many other languages).
- Extracts specially formatted comments.
- Automatically generates documentation in multiple formats:
- HTML (viewable in any browser)
- PDF / LaTeX
- Man pages
- Graphs and diagrams (with Graphviz)
It’s like having a personal technical writer who works directly from your source code.
🔹 What is a Doxyfile?
The Doxyfile is the configuration file Doxygen uses to determine:
- Which files to document
- Which languages to parse
- Whether to generate graphs or UML diagrams
- What output format to use (HTML, PDF, etc.)
You can generate a default Doxyfile with:
doxygen -g
This creates a Doxyfile in your current directory, which you can then edit to customize your documentation.
🔹 Why Use PlantUML and Graphviz with Doxygen?
While Doxygen can generate basic diagrams, integrating PlantUML and Graphviz allows you to create more complex and visually appealing diagrams.
- PlantUML lets you create UML diagrams using a simple text-based syntax.
- Graphviz generates graphs and diagrams from DOT files, which Doxygen can produce. This combination enhances your documentation with:
- Class diagrams
- Sequence diagrams
- State diagrams
- Call graphs
- Collaboration diagrams
🔹 Installing Doxygen, PlantUML and Graphviz
Step 1: Install doxygen
- Ubuntu
sudo apt-get install doxygen
- Arch Linux
sudo pacman -S doxygen
Step 2: Install Graphviz
- Ubuntu
sudo apt-get install graphviz
- Arch Linux
sudo pacman -S graphviz
Step 3: Install PlantUML
PlantUML requires Java to run. Make sure you have Java installed, then install PlantUML:
- Ubuntu
sudo apt-get install plantuml
- Arch Linux
sudo pacman -S plantuml
🔹 Why Write and Configure Your Own Doxyfile?
When you run:
doxygen -g
After running this, Doxygen generates a default Doxyfile with nearly 3000 lines of configuration.While it contains every possible option, it can be overwhelming and cluttered, especially for beginners. It includes many settings that you may never use, making it hard to find the options you actually need. By writing your own Doxyfile from scratch, you can:
- Keep it clean and simple: Only include the settings you actually need.
- Understand each option: Learn what each configuration does, making it easier to customize later.
- Tailor it to your project: Focus on the specific features and outputs that matter to you.
🔹 Understanding Doxyfile configuration
Now, let’s go through each important section of a Doxyfile step-by-step.
First, create a new file named Doxyfile in your project directory and open it in your favorite text editor.
1. Project Information
The first section defines basic metadata about your project.
PROJECT_NAME           = "MyProject"
PROJECT_BRIEF          = "A brief description of MyProject"
PROJECT_LOGO           = "path/to/logo.png"
OUTPUT_DIRECTORY       = docs
PROJECT_NAME: The name of your project.PROJECT_BRIEF: A short description of your project.PROJECT_LOGO: Path to a logo image to include in the documentation.OUTPUT_DIRECTORY: Where the generated documentation will be saved.
2. Input Sources
This section specifies which files and directories to include in the documentation.
INPUT                  = .
FILE_PATTERNS          = *.cpp *.h *.py
RECURSIVE              = YES
INPUT: The directories or files to scan for documentation.FILE_PATTERNS: File extensions as per language used in the project.RECURSIVE: If set toYES, Doxygen will search subdirectories. IfNO, it will only scan the root directory.
3. Build Options
This section controls how Doxygen processes the input files.
EXTRACT_ALL            = YES
EXTRACT_PRIVATE        = YES
EXTRACT_STATIC         = YES
EXTRACT_LOCAL_CLASSES  = YES
EXTRACT_LOCAL_METHODS  = YES
EXTRACT_ALL: IfYES, Doxygen will document all entities, even those without comments.EXTRACT_PRIVATE: IfYES, private class members will be included in the documentation.EXTRACT_STATIC: IfYES, static members will be documented.EXTRACT_LOCAL_CLASSES: IfYES, local classes (defined within functions) will be documented.EXTRACT_LOCAL_METHODS: IfYES, local methods (defined within functions) will be documented.
4. Output Formats
This section specifies which output formats to generate.
GENERATE_HTML          = YES
GENERATE_LATEX         = NO
GENERATE_HTML: IfYES, Doxygen will generate HTML documentation.GENERATE_LATEX: IfYES, Doxygen will generate LaTeX documentation (useful for creating PDFs).
5. Graphs and Diagrams
This section enables the generation of graphs and diagrams using Graphviz and PlantUML.
HAVE_DOT               = YES
DOT_PATH              =
DOT_IMAGE_FORMAT       = svg
CALL_GRAPH             = YES
CALLER_GRAPH           = YES
CLASS_DIAGRAMS        = YES
UML_LOOK               = YES
DOT_GRAPH_MAX_NODES = 50
INTERACTIVE_SVG     = YES
HAVE_DOT: IfYES, enables Graphviz support for generating graphs.DOT_PATH: Path to the Graphvizdotexecutable (if not in your system PATH).DOT_IMAGE_FORMAT: The format for generated graph images (e.g.,svg,png).CALL_GRAPH: IfYES, generates call graphs for functions.CALLER_GRAPH: IfYES, generates caller graphs for functions.CLASS_DIAGRAMS: IfYES, generates class diagrams.UML_LOOK: IfYES, uses a UML-like style for class diagrams.DOT_GRAPH_MAX_NODES: Limits the number of nodes in generated graphs to avoid clutter.INTERACTIVE_SVG: IfYES, generates interactive SVG diagrams(zoomable and pannable).
Tip : If your graphs are too cluttered, try reducing
DOT_GRAPH_MAX_NODESor simplifying your code structure.
6. PlantUML Integration
To integrate PlantUML, you need to specify the path to the PlantUML jar file.
PLANTUML_JAR_PATH = /path/to/plantuml.jar
PLANTUML_JAR_PATH: Path to the PlantUML jar file. This allows Doxygen to generate UML diagrams using PlantUML.
7. Complete Doxyfile Example
Here’s a complete example of a simple Doxyfile with the above configurations:
# --- Project Information ---
PROJECT_NAME           = "MyProject"
PROJECT_BRIEF          = "A brief description of MyProject"
PROJECT_LOGO           = "path/to/logo.png"
OUTPUT_DIRECTORY       = docs

# --- Input Sources ---
INPUT                  = .
FILE_PATTERNS          = *.cpp *.h *.hpp *.py *.java *.js *.ts *.go *.cs
RECURSIVE              = YES

# --- Build Options ---
EXTRACT_ALL            = YES
EXTRACT_PRIVATE        = YES
EXTRACT_STATIC         = YES
EXTRACT_LOCAL_CLASSES  = YES
EXTRACT_LOCAL_METHODS  = YES

# --- Documentation Output ---
GENERATE_HTML          = YES
GENERATE_LATEX         = NO

# --- Diagrams & Graphs ---
HAVE_DOT               = YES
DOT_PATH              =
DOT_IMAGE_FORMAT       = svg
CALL_GRAPH             = YES
CALLER_GRAPH           = YES
CLASS_DIAGRAMS        = YES
UML_LOOK               = YES
DOT_GRAPH_MAX_NODES = 50
INTERACTIVE_SVG     = YES


# --- PlantUML Integration ---
PLANTUML_JAR_PATH      = /path/to/plantuml.jar
7. Running Doxygen
Once your Doxyfile is configured, you can generate the documentation by running in your terminal:
doxygen Doxyfile
Then, open the generated HTML documentation in your web browser:
xdg-open docs/html/index.html # Linux
open docs/html/index.html # macOS
start docs\html\index.html # Windows
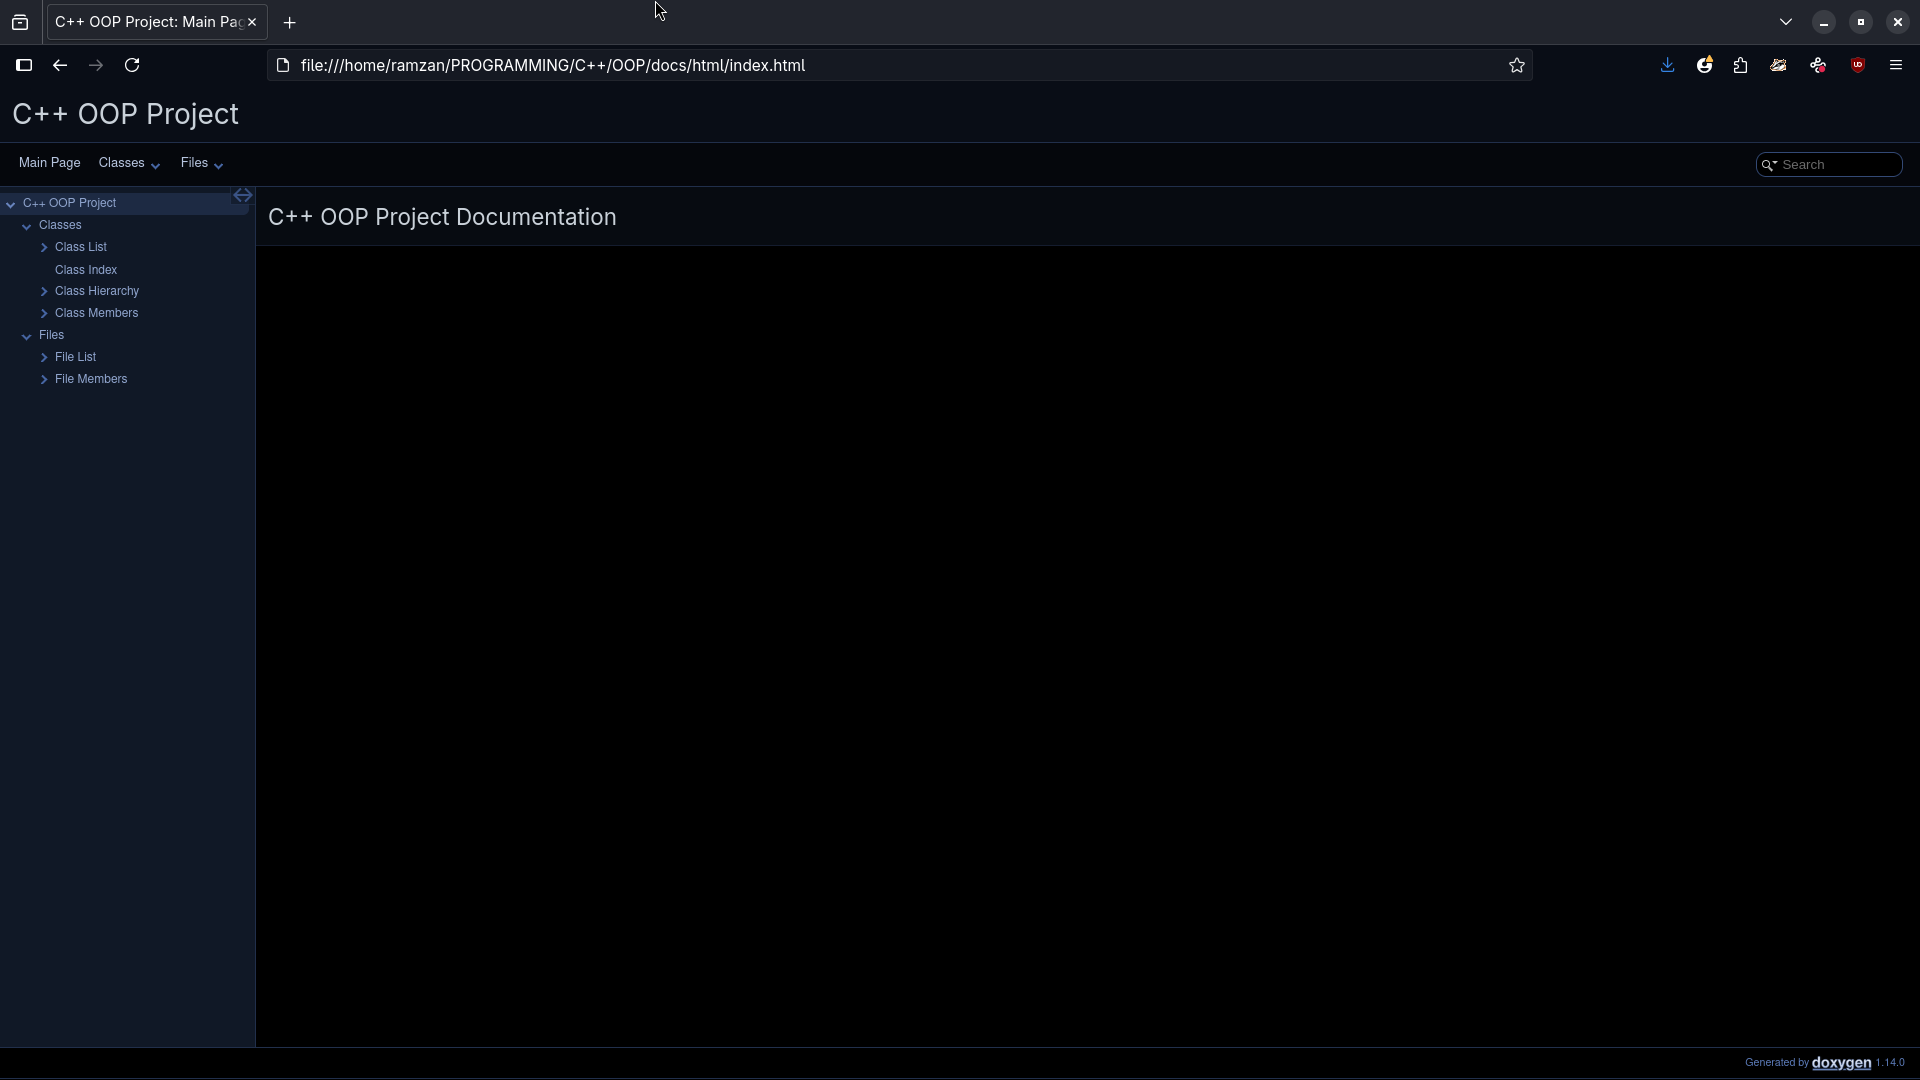
It will open the main page of your generated documentation, there you can navigate through classes, files, and diagrams. Following is the sample output of the documentation:
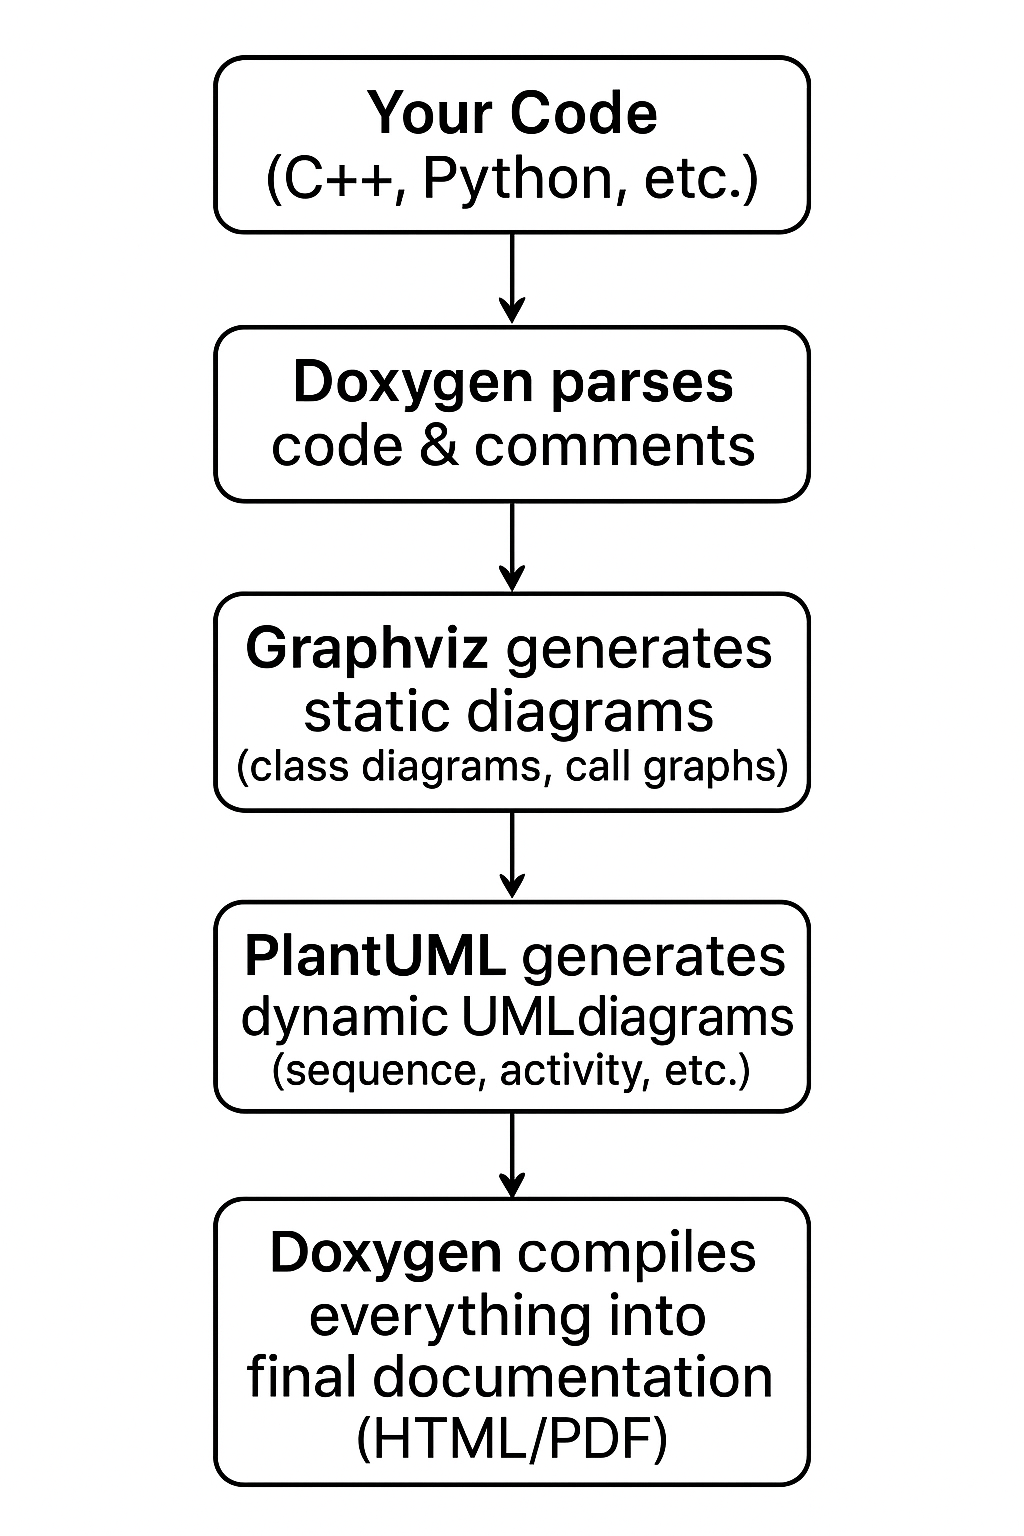
🔹 How it works
Below is a visual representation of how Doxygen, Graphviz, and PlantUML work together:
🔹 Conclusion
Using Doxygen with PlantUML and Graphviz allows you to create comprehensive, visually appealing documentation for your projects with minimal effort. By writing a clean and tailored Doxyfile, you can ensure that your documentation meets your specific needs and showcases your code effectively. It can save you time, improve code maintainability, and enhance collaboration within your team.
In short: Well-documented projects are easier to maintain, scale, and share.
If you want your code to speak for itself, Doxygen is one of the best investments you can make.
🔹 Additional Resources
Happy Documenting! 🚀